
Wednesday, November 13, 2013
Your Birthstone by Month
A birthstone is usually a gemstone that signifies the month of birth and tend to be extremely special and personal possession for the individual that wears it. Did you know that each month of the year has more than one birthstone, and each symbolize a distinct quality or character? Here is the list of birthstones by month, the corresponding zodiac sign and the character that symbolize the birthstone.

Monday, August 12, 2013
Sterling Silver Alphabet Necklace - Personalize your Necklace
Adorable pure sterling silver letters make this basic and stylish necklace featuring a dainty delicate sterling silver chain and a tiny little alphabet of your choice. A wonderful gifting choice to your friends and family or as a forever go-to necklace that will remain timeless. Layer with other longer necklaces in your collection or wear it alone to show some personal style! Now available at Sparkle Chains.

 |
| Wear alone or layer with longer necklaces |
Tuesday, July 30, 2013
Personalized Silver Necklaces from Sparkle Chains
These tiny sterling silver filled pendants are perfect for your everyday wear with a personalized alphabet hand stamped on it. Lightweight and radiant on catching light, these thin disc and rectangle pendants are hung on sterling silver chain at 16 inches in length. Take a look, or shop at Sparkle Chains! Choose from two styles of fonts - the stylized italics uppercase or the Calligraphy Uppercase!


Tuesday, June 25, 2013
Chic Black Necklaces to match your Little Black Dresses!
Effortlessly chic, Little Black Dresses are a must have in every woman's closet. Keep a sexy strapless one for an elegant night out with your partner on your anniversary and a more conservative one ready for those formal traditional and less personal occasions.
To bring the whole outfit together, I have several gorgeous chic black necklaces in my boutique that pair well with your favorite black ensemble. Some of my latest designs are the Black Teardrop Pendant Necklace and the Gold- Black Onyx Necklace. Click on images or to shop page on top right to check out more images and description.

To bring the whole outfit together, I have several gorgeous chic black necklaces in my boutique that pair well with your favorite black ensemble. Some of my latest designs are the Black Teardrop Pendant Necklace and the Gold- Black Onyx Necklace. Click on images or to shop page on top right to check out more images and description.
 |
| Black Teardrop Pendant Necklace, at Sparkle Chains |
 |
| Gold Black Evening Necklace at Sparkle Chains |
 |
| Chic Triangle Cut Black Necklace at Sparkle Chains |

Friday, May 31, 2013
June Sale! 5% off all sparkling necklaces
Here is a fabulous sale in my shop - enjoy a 5% off any necklace over $19.00 using coupon SAVESUM
Ends June 7 2013.
Here is a new lariat necklace I designed in gold fill chain featuring a milky white glass crystal and a veined leaf drop. In store now at Sparkle Chains.
Ends June 7 2013.
Here is a new lariat necklace I designed in gold fill chain featuring a milky white glass crystal and a veined leaf drop. In store now at Sparkle Chains.
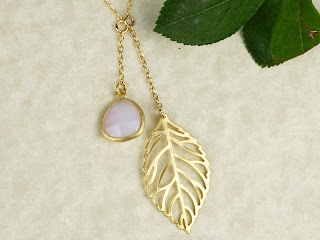 |
| Modern Lariat Necklace at Sparkle Chains |
Thursday, May 30, 2013
Elegant New Necklaces for Summer
Who does not love an anchor pendant? Here is my latest necklace with a sweet 14K gold fill chain for everyday wear or gifting.
I love wearing this necklace on a sunday afternoon for a casual stroll around the park or exploring a new beach town. The nautical theme is perfect for beach inspired vacations and getaways.
Another one of my favorite new necklaces in shop is this Forest Green Silver Necklace that would accessorize so well with a simple white dress for a summer party.
 |
| Anchor Necklace in Gold from Sparkle Chains |
I love wearing this necklace on a sunday afternoon for a casual stroll around the park or exploring a new beach town. The nautical theme is perfect for beach inspired vacations and getaways.
Another one of my favorite new necklaces in shop is this Forest Green Silver Necklace that would accessorize so well with a simple white dress for a summer party.
 |
| Forest Green Silver Necklace from Sparkle Chains |
Thursday, February 28, 2013
Tutorial : Colorful Stackable Bracelet Bangles
 |
| Stackable Easy to Make Memory Wire Bracelets |
- Standard bracelet size stainless steel silver plated memory wire (I got mine from Fire Mountain Gems)
- Memory wire cutters (NEVER use any other cutters to cut memory wire, the steel wire will damage regular cutters)
- Round nose pliers (for making loops at the ends)
- Beads/crystals of your choice (here, I used enough blue crystal bead assortment to complete three full circles/coils)
- some bead dangles/charms for the ends (optional)
- 2 jump rings for dangling the charms at the ends.
 |
| Supplies for this project |
Now, memory wire is a snug coil wire made of tempered steel that holds it shape and fits any wrist. You simply coil the bracelet layer after layer and wear it that way. Here, I am making a bracelet with three full coils.
Step1: Cut approximately three full coils from the memory wire coil using memory wire cutters. These cutters are specially designed to cut memory wire only, hence use these and not your regular wire cutters. I got my memory cutters from Fire Mountain Gems.
 |
| Three coils removed using memory wire cutters from the main coil stock. |
Step 2 : Make a simple loop at one end of the cut memory wire using round nose pliers.
 |
| loop at one end of the wire |
Step 3: Start adding beads of your choice through the non-loop end of the wire. Here, I used a mix of blue-green crystals to make a bohemian themed bracelet.
 |
| add beads of choice |
Step 4: When there is about a half inch of free wire left at the end, make the second loop with round nose pliers, similar to the one you make earlier. Now you have a two opposite ended looped bracelet with beads!
 |
| Stop adding beads when you have half inch left of the wire |
 |
| make a loop at this end similar to the previously made loop |

 |
| The finished Bracelet with Three Coils & Dangles at the ends |
Tuesday, February 26, 2013
Crushed Coin Disc Necklace
This is my current favorite design: I keep wearing this on weekend dinner events, and those times I want to dress up just a little bit. I like that the necklace is light and sparkly without going over the top. If you like this design, I have it up for sale in my Shop.
 |
| Crushed Disc Coin Necklace in Gold |
 |
| A delicate accessory for your neck! |
Monday, February 25, 2013
Floral
Weather has started to warm up nice and cosy, I am looking forward to spring already! Here is a spring romance inspired necklace - NEW!! from Sparkle Chains - in lariat style that gives an incredibly elegant decorative overall look to your neck, sitting pretty at your collarbone.

Since I was thinking flowers and spring all this time, here is my new spring/floral inspired collection of goodies from our fabulous Etsians!
 |
| Spring Romance Necklace |
Since I was thinking flowers and spring all this time, here is my new spring/floral inspired collection of goodies from our fabulous Etsians!
 |
| Spring Flower Treasury |
Friday, February 22, 2013
My Fave Etsy Picks this Week
Time to list my top 3 Etsy Faves this week!
1. Hand-painted vintage bowl "somewhat angular", black and white, from RoomforEmptiness, $20.29 USD
This bowl is beautiful in its simplicity and hand painted floral ring design. With a monochromatic color palette and stunning photography, this bowl has warmed its way into my heart. The seller also has several other glassware in the same style - modern with vintage fusion.
2. Blue and Green Dots Clutch with Applique by MiCasaBella, $55.00
A stylish clutch purse for the Spring-Summer Parties. Love the polka dots in fresh blue-green tones with the cute little knob in blue as a pretty detail that makes this clutch truly stand out. I think this is a great gifting purse.
3. Black Bud Ring. Sterling Silver from lachicadelosanillos, $65.00
All handcrafted, the sterling silver ring with buds embellishment on top is beautiful and stylish with handmade beauty. This seller also has other gorgeous rings that would surely have you shopping here again and again!
1. Hand-painted vintage bowl "somewhat angular", black and white, from RoomforEmptiness, $20.29 USD
 |
| Hand Painted Bowl |
2. Blue and Green Dots Clutch with Applique by MiCasaBella, $55.00
 |
| Gorgeous Blue-Green Clutch |
3. Black Bud Ring. Sterling Silver from lachicadelosanillos, $65.00
 |
| Sterling Silver Black Bud Ring |
Cross Necklaces
Wearing a simple cross around your neck makes for an all day everyday faith inspired necklace. Here are the two designs available at Sparkle Chains, more to come!
 |
| Little Gold Cross Charm Pendant Necklace |
 |
| Sideways Cross Silver Necklace |
Wednesday, February 20, 2013
Copper and Silver Necklace
 |
| Shimmering Copper Necklace with Sterling Silver Chain |
 |
| Copper Ball Necklace with Sterling Silver Link Chain |
Tuesday, February 19, 2013
Storage Ideas for your Jewelry
If you are a jewelry designer like me, you will soon end up accumulating tons and tons of beautiful supplies - headpins, jump rings, beads, crystals, chains, links, crimps, pearls, findings, clasps and what not. Not taking proper storage measures to neatly organize these little building blocks of jewelry can be the perfect recipe for clutter and chaos later on. From my experience, it is always a good idea to start right from the beginning, when you start to slowly accumulate these supplies. Start with a few stackable storage boxes and build up depending on how much your supply collection grows.
Here are some great ways to store your jewelry supplies or finished jewelry
Divided Clear Boxes with multiple compartments
This compartment storage box closes tight, is easy to see whats inside without opening and has numerous little divided spaces that can each store your small jewelry beads and findings. You can also label each compartment as the dividing bars are quite tall. Or you can buy several of these boxes and stack them up for a cohesive feel to your supplies shelf. I label each box with a number, and then label each separate space with whats inside. To refer back later, I have a separate inventory book that tells me what each box (identified by its number) contains. This system takes some time and lot of patience to start, but once it is set up, you will thank the world for this system saving valuable time that you would otherwise spend trying to find that headpin or jumpring.
Non-jewelry makers can also find this box a big help : you can sort and separate all your earrings and store them in these little spaces, this way it is easy to find what you are looking for when in a hurry and the gold earrings wont mix up with the silver ones. Closing the box reduces chances of tarnishing as well.
Multi Drawer Small Cabinets
The best thing about these cabinets is that they can either be wall mounted or stored on table top. The Container Store has these efficient organizers in a variety of shapes and sizes that is worth checking out. You simply pull out each mini-drawer and store your supplies or jewelry. These are also perfect for storing any craft or art supplies, scrapbooking stuff or small tools.
Anti-Tarnish Bags
Sometimes, you don't want to leave chain or findings made of precious metals (sterling silver or 14K gold) exposed to air in the stackable drawers. For such instances, you can add another level of security by storing them in these anti tarnish bags that are self sealed and prevent tarnish or rust formation for about 12 months/bag. I label each bags with what is inside and store several such bags in small storage bins.
What methods do you use to store your jewelry supplies? Share with me!
Here are some great ways to store your jewelry supplies or finished jewelry
Divided Clear Boxes with multiple compartments
 |
13-1/8" x 9" Clear 24-Compartment Box from The Container Store |
Non-jewelry makers can also find this box a big help : you can sort and separate all your earrings and store them in these little spaces, this way it is easy to find what you are looking for when in a hurry and the gold earrings wont mix up with the silver ones. Closing the box reduces chances of tarnishing as well.
Multi Drawer Small Cabinets
 |
Multi-Drawer Cabinets from The Container Store |
Anti-Tarnish Bags
 |
Pro-Tectant Anti-Tarnish Anti-Rust Plastic Bags from Rio Grande |
Sometimes, you don't want to leave chain or findings made of precious metals (sterling silver or 14K gold) exposed to air in the stackable drawers. For such instances, you can add another level of security by storing them in these anti tarnish bags that are self sealed and prevent tarnish or rust formation for about 12 months/bag. I label each bags with what is inside and store several such bags in small storage bins.
What methods do you use to store your jewelry supplies? Share with me!
Friday, February 15, 2013
A sleek way to dress up walls for storage - Urbio
So I am a regular follower of the Shark Tank, the wonderfully exhilarating show on ABC where start up entrepreneurs come with a great idea, product or service in hopes of seeking investment and support from a bunch of rich "shark" millionaires. Couple of weeks back, I happened to love one of the products that was featured in the show, called URBIO.
I was totally blown away by this uber cool vertical garden that seems super easy to mount on the walls of an apartment, loft or home. You can even attach it through its magnetic backs onto the refrigerator, use these are table top or wall storage units. That walls can serve as stylish storage areas in a tiny living space is not much explored, with URBIO, one can store magazines, that ever disappearing TV remote or phone on the wall..and these are not just restricted to plants. I fell in love with this sleek design right away - kind of like how I fell in love with my first ever iphone!
Sleek, effortlessly simple and clean designs blow me away. Let's face it - simple designs are the hardest to create. Which is why I think URBIO is a winner all the way - these vertical storage pots provide sleek industrial design with versatile functionality that is hard to resist - I am getting one of these very soon for my studio. URBIO is a a SF based company , that excites me even more. I hope they make these little pots in more colors and shapes - i can only imagine the possibilities..
I was totally blown away by this uber cool vertical garden that seems super easy to mount on the walls of an apartment, loft or home. You can even attach it through its magnetic backs onto the refrigerator, use these are table top or wall storage units. That walls can serve as stylish storage areas in a tiny living space is not much explored, with URBIO, one can store magazines, that ever disappearing TV remote or phone on the wall..and these are not just restricted to plants. I fell in love with this sleek design right away - kind of like how I fell in love with my first ever iphone!
 |
| URBIO |
Sleek, effortlessly simple and clean designs blow me away. Let's face it - simple designs are the hardest to create. Which is why I think URBIO is a winner all the way - these vertical storage pots provide sleek industrial design with versatile functionality that is hard to resist - I am getting one of these very soon for my studio. URBIO is a a SF based company , that excites me even more. I hope they make these little pots in more colors and shapes - i can only imagine the possibilities..
 |
| Think of the possibilities of storage with this neat platform! |
Wednesday, February 13, 2013
Monochromatic Black n White
My latest color addiction is anything black and white..to that effect, here is my latest Etsy treasury!
 |
| http://www.etsy.com/treasury/Mjc3NjMxNDR8MjcyMTQxMTQwNw/black-n-white?ref=pr_treasury |
Crystal Wrapped Hoop Earrings Tutorial
 |
| Learn to make these gorgeous handmade hoops! |
Do you like to add some dazzle to the wire earrings
we learned to make in the last tutorial? If yes, learn this easy to learn
wire wrapping to embellish your choice of beads, pearls or crystals onto
a hoop frame. You can wire wrap just about any hoop earring using this
technique. I guarantee, once you get going, its going to get addictive and you may not stop at just one pair. Note that, this tutorial starts from where I left off in the Part 1: making the hoop frame.
TOOLS & SUPPLIES
METHOD
Step 1: Make a pair of wire hoop earrings using the Steps Outlined in my Wire Hoops Tutorial. The hoops shown here are approximately 1.1 inches in diameter.
All the remaining steps below are for one earring, repeat for the other to complete the pair.
Step 2: Measure and flush cut about 23 inches of the 26 gauge jewelry wire using flush cutters. (Use the same color wire as the hoop earring to give a professional look – here I used copper wire for both hoop earrings and wire for wrapping). Straighten the wire of any kinks either by running them through a nylon jaw pliers.
Step 3: Make four tight coils of the 26 gauge wire around the hoop starting at the top (close to the ear wire), leaving a long end and a short tail about 1.2 inches long. Tug lightly at the long and short wires to make sure your coils are tight and even on the hoop.
Step 4: Now slide one crystal bead on the long end of the wire and position it with your fingers to stay on the top of the hoop frame.

Step 5: Keeping the bead clasped with your fingers, use your other hand to wrap around the hoop three times, firmly and tightly. You can always reposition the bead if it has moved slightly.
 Step 6: At the third wrap, slide another crystal bead on the 26 gauge wire, and repeat the wrapping three times around the hoop frame.
 Step 7: Repeat the process, tightening each wrap after adding a bead by tugging lightly at the long wire.
Every now and then, run your fingers along the free wire to remove any bends or kinks that may have formed during the wrapping process.
(Tip: Always count wraps before adding beads to ensure you have wrapped three times each time. Move the wrapped beads gently using your fingers to space them evenly on the hoop.
TOOLS & SUPPLIES
- The pair of hoop earrings (that you made using Steps outlined in my earlier Tutorial)
- Jewelry Wire - 26 gauge ( use the same colored metal wire as the hoop earrings you made earlier). You will need about 23 inches of wire per hoop (total of 46 inches for two hoops of a pair)
- Bead of your choice (Here, I used 40 red fire polished crystal rondelles 5mm in size – 20 beads wrapped per hoop).
- Chain nose pliers, Flush Cutters/Nipper Tool
 |
| Tools and Supplies For this Project |
Step 1: Make a pair of wire hoop earrings using the Steps Outlined in my Wire Hoops Tutorial. The hoops shown here are approximately 1.1 inches in diameter.
 |
| The wire hoop frames from Part 1 |
All the remaining steps below are for one earring, repeat for the other to complete the pair.
Step 2: Measure and flush cut about 23 inches of the 26 gauge jewelry wire using flush cutters. (Use the same color wire as the hoop earring to give a professional look – here I used copper wire for both hoop earrings and wire for wrapping). Straighten the wire of any kinks either by running them through a nylon jaw pliers.
Step 3: Make four tight coils of the 26 gauge wire around the hoop starting at the top (close to the ear wire), leaving a long end and a short tail about 1.2 inches long. Tug lightly at the long and short wires to make sure your coils are tight and even on the hoop.
 |

Step 5: Keeping the bead clasped with your fingers, use your other hand to wrap around the hoop three times, firmly and tightly. You can always reposition the bead if it has moved slightly.


Every now and then, run your fingers along the free wire to remove any bends or kinks that may have formed during the wrapping process.
(Tip: Always count wraps before adding beads to ensure you have wrapped three times each time. Move the wrapped beads gently using your fingers to space them evenly on the hoop.
Step 8: You may find the
short wire tail sticking out at the beginning of the wire wrap getting
in the way of continuing your wrapping process. At this time, you can
snip off the short tail using flush cutters and tuck the ends into the
coil (see the images below).


Step 9: Continue the wrapping process adding one bead at a time, then three wraps and so on till you have covered the entire hoop frame and reached beginning of the hoop at the other side. Now, make four final wraps to complete the bead wrapping, snip off excess wire using flush cutters and tuck in any sticking out wire ends.


 |
| One completed wrapped hoop earring. |
I hope you enjoyed this tutorial. Let me know if you have any questions!
Subscribe to:
Posts (Atom)