 |
| Simple Hand Formed Wire Hoop Earrings |
Tools and Supplies Required
- 18 or 20 gauge wire of your choice (for practice, use copper or any other inexpensive wire). You will need about 8 to 9 inches of wire for each earring (total 16 to 18 inches of wire for a pair)
- Chain nose pliers
- A marker pen
- Flush/Side cutters or wire nipper tool
- Rawhide mallet & steel block (optional, for straightening wire)
- Metal file or burr cup
- Flat nose pliers
- A round cylindrical object about 1 inch to 1.2 inches in diameter (in this project, I used a glue stick tube about 1.1 inch in diameter).
Method:
Step 1: Cut about 8 or 9
inches of 18 or 20 gauge jewelry wire of your choice using flush
cutters. Make sure the wire ends are neat and flush cut (straight cut).
Here, I am demonstrating using 18 gauge copper craft wire from Bead
Smith.
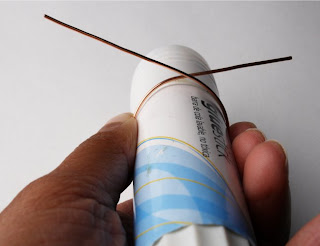
Step 2: Form the circular shape by using a round solid object as template (glue stick tube or any round cylindrical solid object that you can find which is 1 to 1.2 inch in diameter). Form the shape in such a way that one end of the wire is slightly longer (approx. 2.2 inch) than the other (approx.1.8 inch) ( see the two images below).
Step 2: Form the circular shape by using a round solid object as template (glue stick tube or any round cylindrical solid object that you can find which is 1 to 1.2 inch in diameter). Form the shape in such a way that one end of the wire is slightly longer (approx. 2.2 inch) than the other (approx.1.8 inch) ( see the two images below).
Step 3: Use flat nose
pliers to grip the longer wire at the point of intersection of both the
wires and make a right angle bend on this wire (making the wire
perpendicular).
Step 4:
Keeping the wire form on the glue stick or your circular template,
proceed to wrap the shorter wire around the longer perpendicular wire
using your chain nose pliers (or your fingers). Make two complete wraps
around the shorter wire.
Step 5: Cut off excess wire after wrapping using flush cutters and tuck the ends in using chain nose pliers.
Step 6: Remove the hoop from the template. It should be a wrapped circle with a long upward tail.
Step 7: We will now make
the attached ear wire using the remaining perpendicular wire. For this,
bend the straight wire downward about 0.5 inches away from the wrap
using a
pencil/pen as template.
Step 8: Use your flat nose pliers to add a little kink in the wire at the bend.
Step 9: Leaving about 0.4
inches length of wire after the kink, snip off remaining wire using
flush cutters. This will be the part that goes through your ear so make
it as long or as short as you like.
Rounden the wire end (that goes through your ear) by rotating it in a burr cup (see image below) or you can use a metal file to file away any sharp ends. 

Your wire hoop earrings are ready! See how easy it is? Now make the other earring to complete the set.
Some More Tips
- You can forge these earrings for texture using bench block and chasing hammer.
- You can alter the size and shape of these earrings using different shaped and sized circular templates.
- You can also use different colored wire for making several of these earrings.


No comments:
Post a Comment